top of page
RILEY KAY
September 2020 - April 2021
ENGINEER 1P13
Learning Portfolio, McMaster University


Project Two - Milestones
Each project milestone for Project Two can be found below:
Milestone 0
Team Milestones
Milestone 1
Milestone 2
Milestone 3
Milestone 4
Individual Milestones
Milestone 1
Milestone 2
Milestone 3
So, in summary... what was our team's goal?
This time, our team was split off into two sub-teams - a modelling sub-team, and a computing sub-team - so in short, half of us actually had completely separate objectives. While the computing sub-team was required to program a robotic arm to transfer sterilization containers into their corresponding autoclave bins depending on their size and colour, the modelling sub-team (i.e., the sub-team I was in) was required to engineer a sterilization container that could both fit into an assigned autoclave footprint, and securely hold a surgical retractor in place.
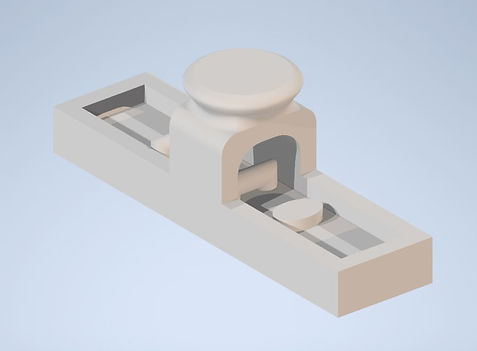
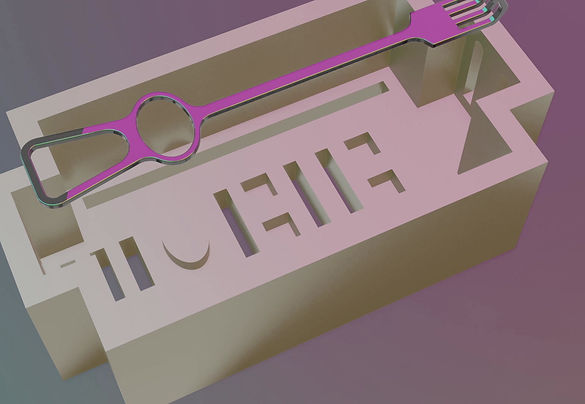
This is what our assigned footprint looked like, and what our retractor looked like, respectively:

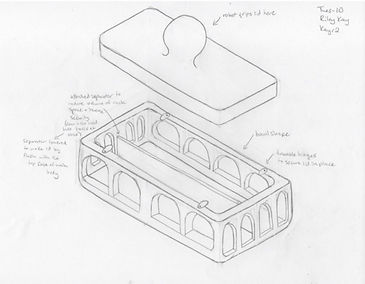
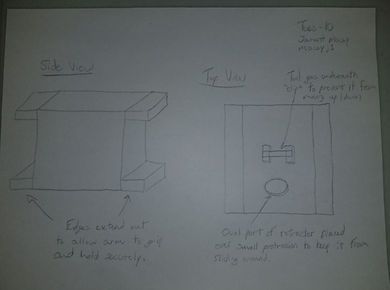
Our sub-team was required to come up with a large assortment of preliminary drawings, some of which had even come from the computation sub-team. After close analysis, I, as well as the other individual on the modelling sub-team, had made refined sketches of containers that included features that each of us thought would be beneficial, among other features. We then swapped sketches, and made low-fidelity prototypes of each other's concepts in order to fill out a Pugh matrix which would soon guide us in which features to keep and which ones to remove.


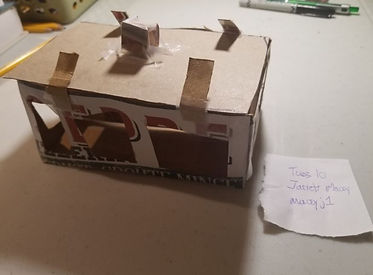
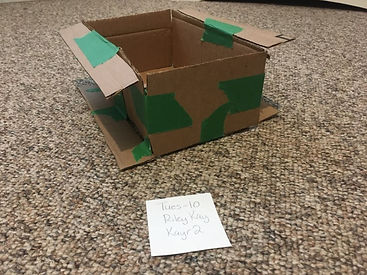
More photographs of each low-fidelity prototype can be found in the Milestone 2 documentation found at the top of this web page.
Using Autodesk Inventor, we then created preliminary solid models of possible designs that we could use for the first version of our sterilization container. When we each displayed our solid models to each other, we then combined the concepts into a "final" design.


More photographs of each preliminary solid model can be found in the Milestone 3 documentation found at the top of this web page.
Of course, with any engineering project, there were some refinements that had to be made to the design. After presenting our design to a staff member, they had suggested that there needed to be more holes on the bottom and on the sides so that the vapours from the sterilization steam could be drained more easily. Because each feature of our design was to be a minimum of four millimetres, there was also a feature we had overlooked that was under this requirement, and that was the distance between the inner edge and the insertion holes that the rings went into. Because this design was eventually going to get 3D printed as well after being scaled down by 50%, they also suggested that in order to prevent the need of supports, we could separate the top portion of the overhang from the main body and make them two separate parts. However, we were hesitant in doing so, since we feared that when the robot grabbed the container at the knob, the main portion of the body would come off underneath the overhang and increasing the risk of either the container breaking, or the retractor inside, or both. It was also suggested that the holes were rectangular instead of elliptical for better ease of printing, and because I thankfully had a 3D printer at home, I was able to print a trial in advance and found out that these holes could also be a tad smaller so that the rings fit more snug inside of them.
Taking these suggestions into account, our model vastly changed. Now, in order to meet the four millimetre requirement, our container very much resembled the shape of the footprint. As well, the container was opened faced instead of having a knob, which also made it easier in taking the rings in and out. There were fillets placed at the top of the four side holes to make printing the overhangs easier and also eliminate the need for supports. However, the container still required a brim, which did require more material, but thankfully, the print was still within a 350-gram limit prior to scaling, and the two-hour print-time limit post-scaling.

Our entire team attended an interview with the staff members on December 3rd at 5:30pm EST, where our sub-team specifically talked about the function of the container, as well as about general graphics design concepts. It was also where we got to see our final product printed all the way from Hamilton (from where I live, Hamilton is about a three hour drive, so it was a pretty fascinating sight to see). Of course, I couldn't help but print the final design here as well, and physically see the contrast between the first version of our container and the final version. I plan to print a version of it at its actual size over the Christmas break as well, just for the fun of it.

PROJECT UPDATE: In March 2021, both the modelling and computing sub teams had gotten an email from one of the ENGINEER 1P13 instructors asking us to send in a 30-second video to be presented at our End-of-Year Project Showcase. We, of course, were thrilled!!
Check out our video submission below:
bottom of page